> ## Documentation Index
> Fetch the complete documentation index at: https://docs.deribit.com/llms.txt
> Use this file to discover all available pages before exploring further.
# Asymmetric API Keys
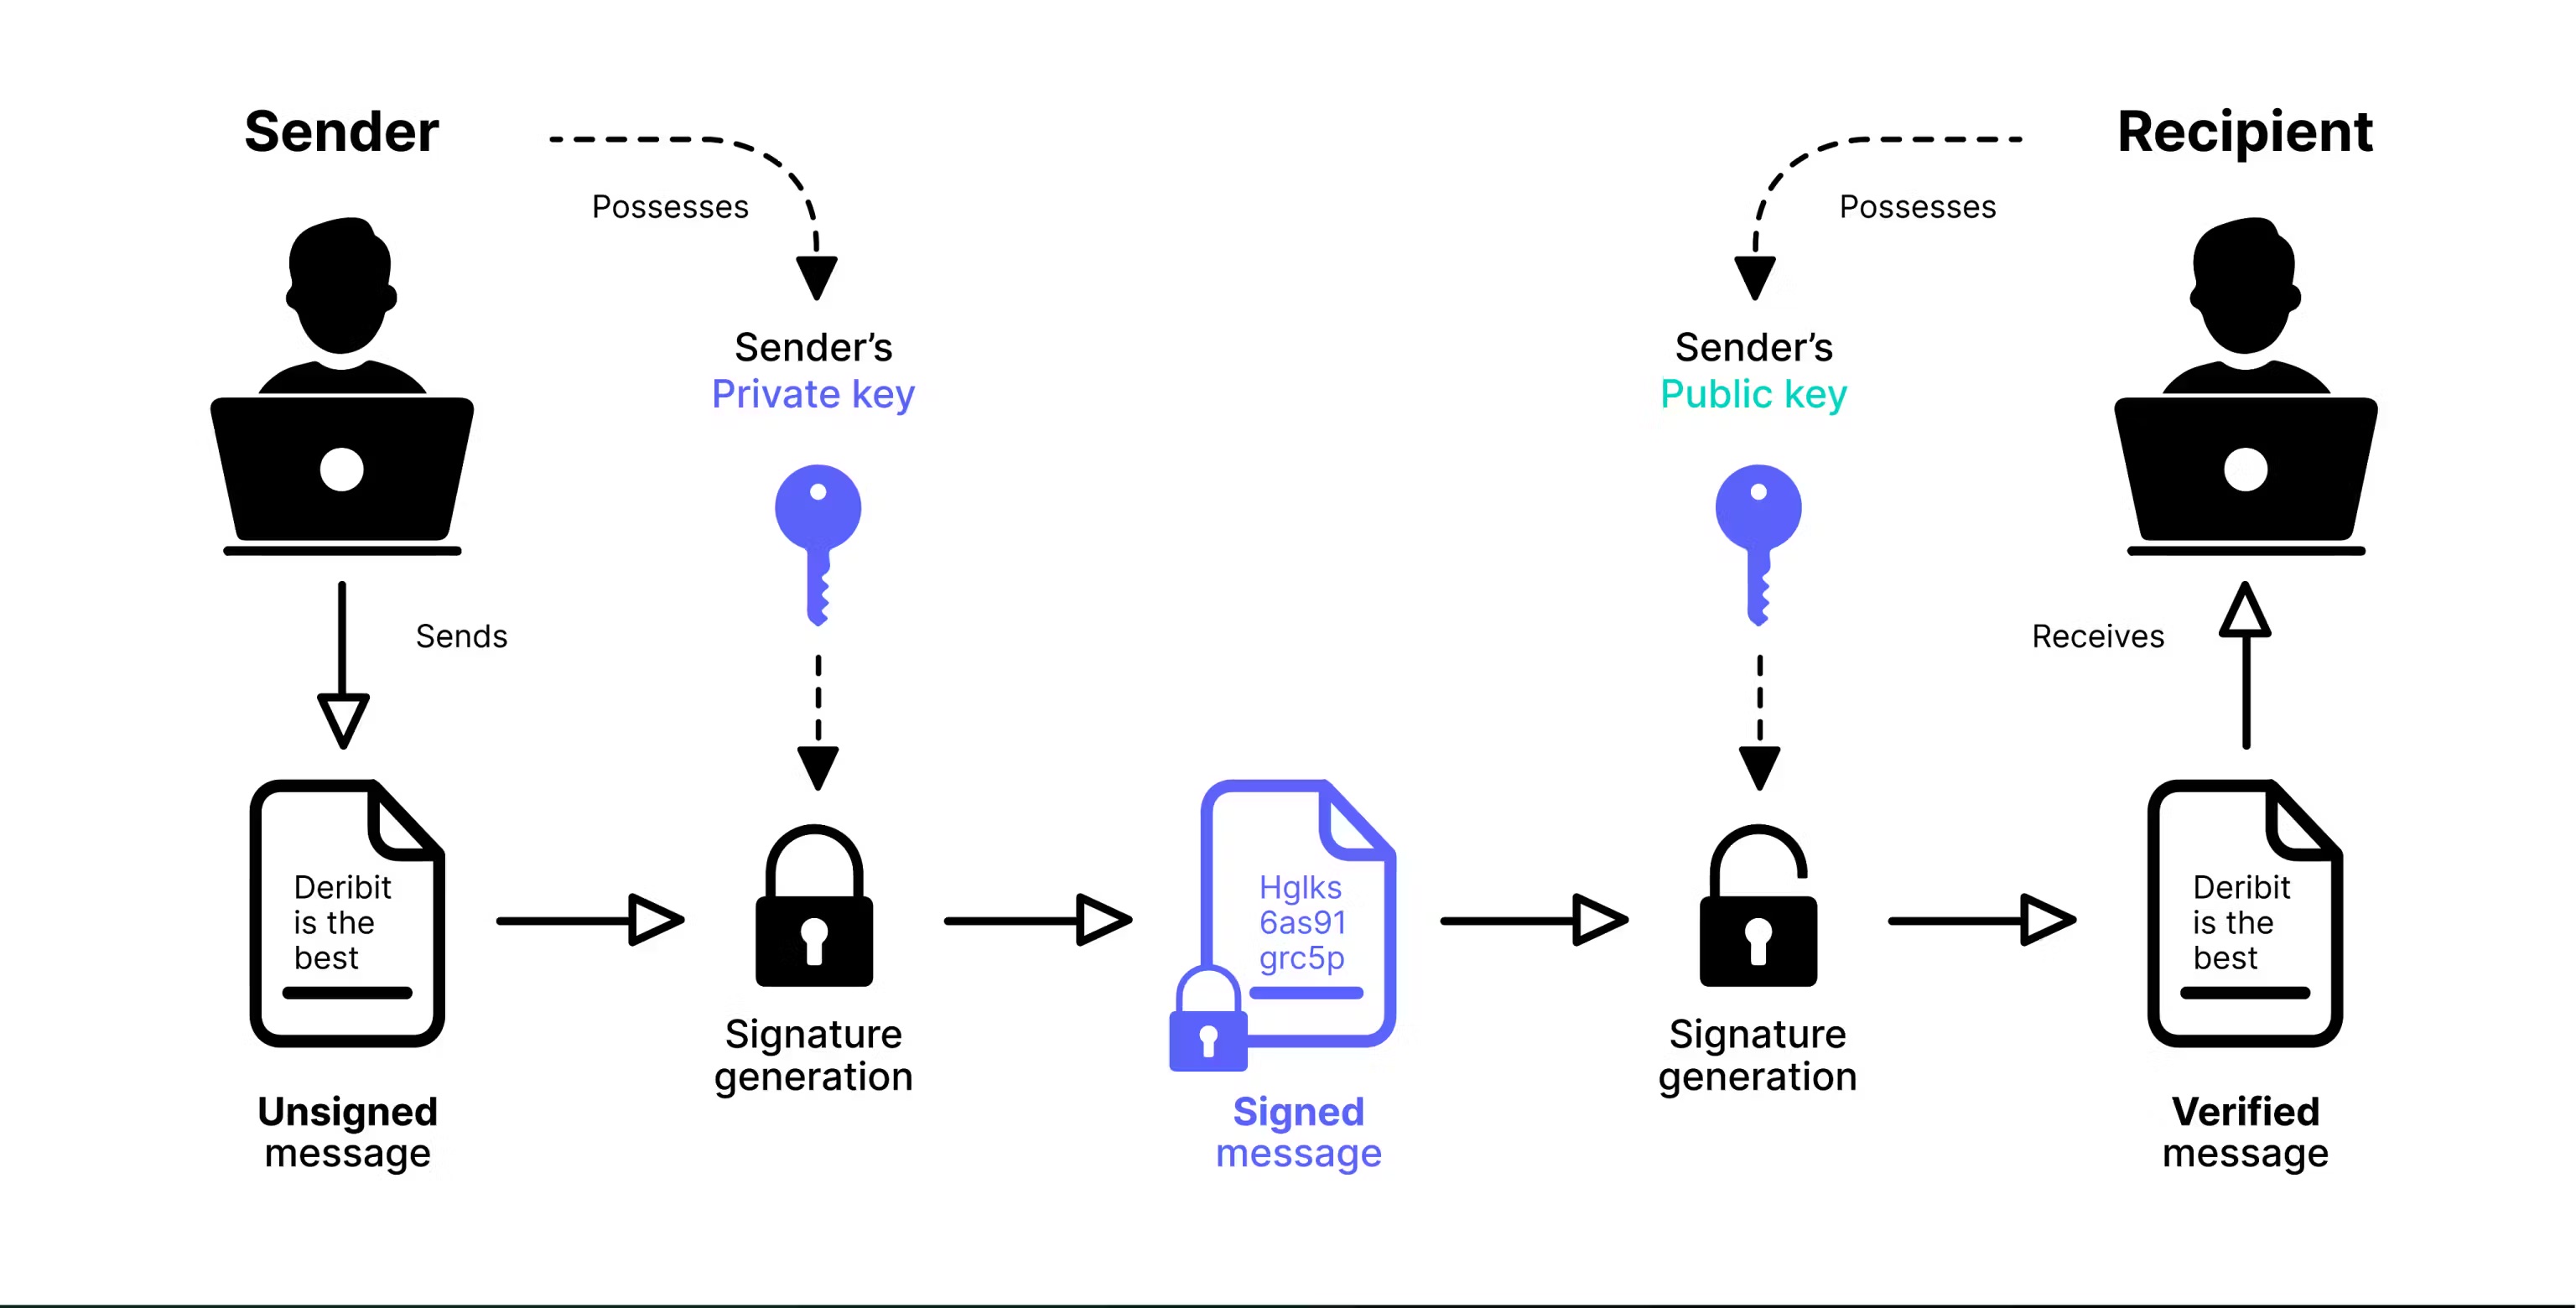
> Asymmetric keys involve the use of two keys: a private key and a public key, which are different but cryptographically linked.
**Asymmetric API keys** provide enhanced security compared to traditional symmetric API keys by using a **public-private key pair** instead of a shared secret. With asymmetric keys, you generate both keys locally, keep the **private key** secret on your system, and only share the **public key** with Deribit.
## How Asymmetric Keys Work
**Asymmetric cryptography** uses two mathematically linked keys:
* **Private Key**: Used to **sign requests** and must be kept secret on your local system
* **Public Key**: Used by Deribit to **verify your signatures** and can be safely shared
The **API key (Client ID)** is generated by Deribit when you register your public key, but the **key pair itself** is generated by you. Deribit supports two key types:
* **Ed25519**: Modern, fast, and secure elliptic curve cryptography (recommended)
* **RSA**: Traditional RSA key pairs (2048-bit minimum)
## Security Benefits
**Enhanced Security Model:**
* **Separation of concerns**: Only you can generate signatures with your private key, while Deribit can verify them with your public key
* **Non-repudiation**: Since only you hold the private key, signatures prove the request came from you
* **No shared secrets**: Unlike symmetric keys, Deribit never has access to your private key
**Additional Protection:**
* **Password protection**: You can encrypt your private key with a password, adding an extra layer of security
* **Local-only private key**: Your private key never leaves your system, reducing the risk of compromise
**Important**: Only **Deribit Signature Credentials** authentication (`grant_type: client_signature`) is available for asymmetric API keys. Standard client credentials authentication is not supported.
## Setup Overview
Setting up an asymmetric API key involves three main steps:
Create your public and private key pair locally using OpenSSL or Python.
Create a new API key on Deribit using your public key.
Use your private key to sign authentication requests.
Learn about client signature authentication
## Step 1: Generate Key Pair
You can generate your public and private key pair using either **OpenSSL** (command-line tool) or **Python** (with the cryptography library). Both methods are equivalent—choose the one that fits your workflow.
**What you'll need:**
* **OpenSSL** (command-line tool) or **Python** with the `cryptography` library
* A secure location to store your private key (never share this file)
### Method 1: Using OpenSSL
**OpenSSL** is an open-source toolkit for secure communication, implementing SSL/TLS protocols and cryptographic functions. It's available on most operating systems.
#### Installing OpenSSL
**Windows**
1. **Check if OpenSSL is installed:**
* Open **Command Prompt** or **PowerShell**
* Run: `openssl version`
* If installed, you'll see the version number
2. **Install OpenSSL:**
* Download from [Win32OpenSSL](https://slproweb.com/products/Win32OpenSSL.html)
* Choose **Win32** or **Win64** based on your system
* Run the installer and follow the setup instructions
**macOS**
1. **Check if OpenSSL is installed:**
* Open **Terminal**
* Run: `openssl version`
* If installed, you'll see the version number
2. **Install OpenSSL:**
* Install **Homebrew** if you don't have it: [brew.sh](https://brew.sh/)
* Run: `brew install openssl`
* **Note**: You may need to add OpenSSL to your PATH. Follow Homebrew's post-installation instructions.
**Linux**
1. **Check if OpenSSL is installed:**
* Open **Terminal**
* Run: `openssl version`
* If installed, you'll see the version number
2. **Install OpenSSL:**
* Installation commands vary by distribution:
```bash theme={null}
sudo apt update
sudo apt install openssl
```
```bash theme={null}
sudo dnf install openssl
```
```bash theme={null}
sudo pacman -S openssl
```
#### Generating Ed25519 Keys
**Step 1: Generate Private Key**
```bash theme={null}
openssl genpkey -algorithm ed25519 -out private.pem
```
This creates a file named `private.pem` containing your **private key**. **Keep this file secure and never share it.**
**Step 2: Extract Public Key**
```bash theme={null}
openssl pkey -in private.pem -pubout -out public.pem
```
This creates `public.pem` containing your **public key**. This is the file you'll provide to Deribit when creating your API key.
**What you have now:**
* `private.pem` - Your private key (keep secret, never share)
* `public.pem` - Your public key (safe to share with Deribit)
### Method 2: Using Python
**Prerequisites:**
* Python 3.6 or higher
* Install the cryptography library: `pip install cryptography`
#### Ed25519 Key Generation
```python theme={null}
from cryptography.hazmat.primitives.asymmetric.ed25519 import Ed25519PrivateKey
from cryptography.hazmat.primitives import serialization
# Generate a new Ed25519 private key
private_key = Ed25519PrivateKey.generate()
# Serialize the private key to PEM format
private_pem = private_key.private_bytes(
encoding=serialization.Encoding.PEM,
format=serialization.PrivateFormat.PKCS8,
encryption_algorithm=serialization.NoEncryption()
)
# Save the private key to a file
# IMPORTANT: Keep this file secure and never share it
with open('private.pem', 'wb') as private_pem_file:
private_pem_file.write(private_pem)
# Extract the corresponding public key
public_key = private_key.public_key()
# Serialize the public key to PEM format
public_pem = public_key.public_bytes(
encoding=serialization.Encoding.PEM,
format=serialization.PublicFormat.SubjectPublicKeyInfo
)
# Save the public key to a file
# This is safe to share with Deribit
with open('public.pem', 'wb') as public_pem_file:
public_pem_file.write(public_pem)
print("Key pair generated successfully!")
print("Private key saved to: private.pem (KEEP SECRET)")
print("Public key saved to: public.pem (safe to share)")
```
#### RSA Key Generation
For RSA keys, Deribit requires a **minimum key size of 2048 bits**.
```python theme={null}
from cryptography.hazmat.primitives.asymmetric import rsa
from cryptography.hazmat.primitives import serialization
# Generate RSA private key (2048-bit minimum required by Deribit)
private_key = rsa.generate_private_key(
public_exponent=65537, # Standard RSA public exponent
key_size=2048 # Minimum key size for Deribit
)
# Serialize the private key to PEM format
private_pem = private_key.private_bytes(
encoding=serialization.Encoding.PEM,
format=serialization.PrivateFormat.PKCS8,
encryption_algorithm=serialization.NoEncryption()
)
# Save the private key to a file
# IMPORTANT: Keep this file secure and never share it
with open('private.pem', 'wb') as private_pem_file:
private_pem_file.write(private_pem)
# Extract the corresponding public key
public_key = private_key.public_key()
# Serialize the public key to PEM format
public_pem = public_key.public_bytes(
encoding=serialization.Encoding.PEM,
format=serialization.PublicFormat.SubjectPublicKeyInfo
)
# Save the public key to a file
# This is safe to share with Deribit
with open('public.pem', 'wb') as public_pem_file:
public_pem_file.write(public_pem)
print("RSA key pair generated successfully!")
print("Private key saved to: private.pem (KEEP SECRET)")
print("Public key saved to: public.pem (safe to share)")
```
## Step 2: Register Your Public Key with Deribit
After generating your key pair, you need to register your **public key** with Deribit to create an API key. You can do this either through the **web interface** or via the **API**.
**What you'll need:**
* Your **public key** (the contents of `public.pem` file)
* Access to your Deribit account
### Option 1: Web Interface
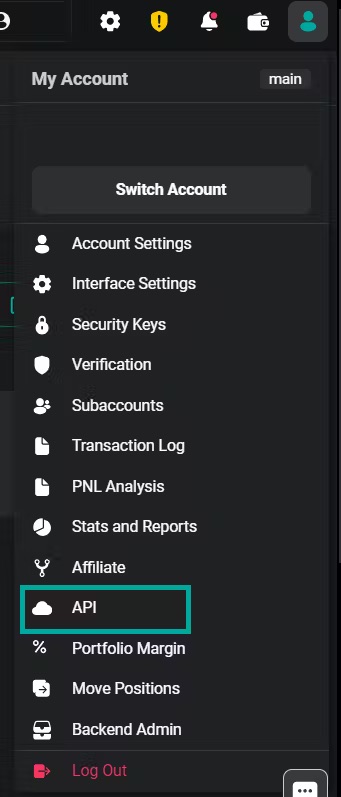
1. **Navigate to API Management**
* Go to your Deribit account settings
* Find the **API Keys** section
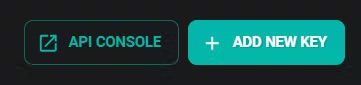
2. **Add New Key**
* Click **"Add new key"** on the right side of the interface
3. **Select Self-Generated Key**
* Choose **"Self-generated"** key type
* Paste your **public key** (the entire contents of your `public.pem` file, including the `-----BEGIN PUBLIC KEY-----` and `-----END PUBLIC KEY-----` lines)
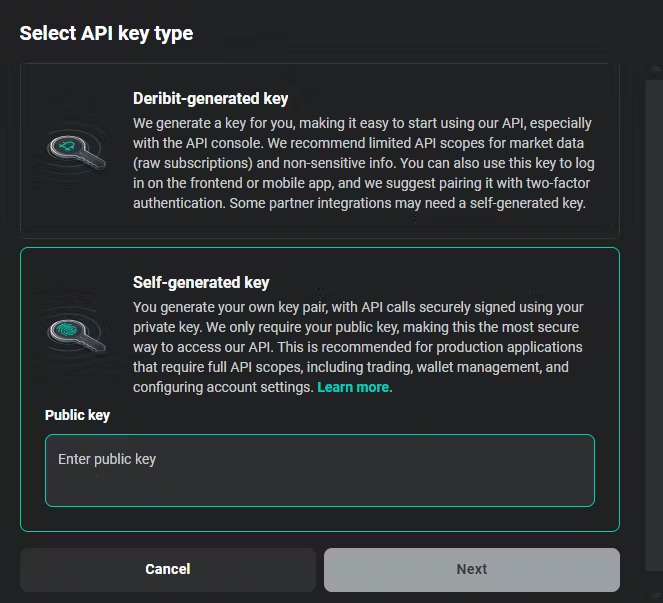
**Important**: Paste the **entire public key file content**, not just the base64 hash. The public key must include the `-----BEGIN PUBLIC KEY-----` header, the base64-encoded key data, and the `-----END PUBLIC KEY-----` footer.
4. **Configure API Key Settings**
* **Scopes**: Define the maximum permissions for this API key. See the [Access Scope documentation](/articles/access-scope) for details on available scopes.
* **Name**: A custom identifier for your key (e.g., "Trading Bot", "Production API")
* **Features**: Optional additional features:
* **Restricted Block Trades**: Limits `block_trade:read` scope to only block trades made with this specific API key. Useful for restricting visibility when sharing API keys with third parties.
* **Block Trade Approval**: Requires additional approval from a different API key before executing block trades. Provides enhanced oversight for partner-managed accounts.
* **IP Whitelisting**: Restrict API access to specific IP addresses for additional security
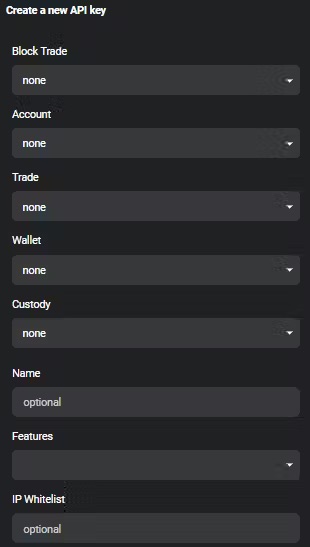
5. **Save and Get Client ID**
* After creating the key, you'll receive a **Client ID**
* **Important**: Save this Client ID—you'll need it for authentication

**Client ID**: The Client ID is a **public identifier** of your API key. It's **not a secret** and can be safely exposed in code, logs, or documentation. It's used to identify which key you're authenticating with, but it cannot be used alone for authentication—you still need your private key to sign requests.
### Option 2: Using the API
You can also create an asymmetric API key programmatically using the [`private/create_api_key`](/api-reference/account-management/private-create_api_key) method. **Note**: You'll need to authenticate with an existing API key to use this method.
**Request Example:**
```json theme={null}
{
"method": "private/create_api_key",
"params": {
"public_key": "-----BEGIN PUBLIC KEY-----\nMCowBQYDK2VwAyEA/pQXmQa6m5NigEfu0UrbjDdzRORWYRluJasNiZau2Lo=\n-----END PUBLIC KEY-----",
"name": "ed25519key",
"max_scope": "account:read trade:read_write wallet:read"
},
"jsonrpc": "2.0",
"id": 1
}
```
**Request Parameters:**
* **`public_key`**: Your public key in PEM format (include the full key with BEGIN/END markers)
* **`name`**: A descriptive name for this API key
* **`max_scope`**: Space-separated list of scopes defining permissions
**Important**: Provide the **entire public key file content**, not just the base64 hash. The public key must include the `-----BEGIN PUBLIC KEY-----` header, the base64-encoded key data, and the `-----END PUBLIC KEY-----` footer.
**Response Example:**
```json theme={null}
{
"jsonrpc": "2.0",
"id": 1,
"result": {
"max_scope": "trade:read_write wallet:read account:read",
"ip_whitelist": [],
"client_secret": "81:c2:76:35:a7:1a:1c:f8:05:71:e1:42:7c:94:2c:4c",
"client_id": "GgUXjYUj",
"enabled_features": [],
"public_key": "-----BEGIN PUBLIC KEY-----\nMCowBQYDK2VwAyEA/pQXmQa6m5NigEfu0UrbjDdzRORWYRluJasNiZau2Lo=\n-----END PUBLIC KEY-----",
"timestamp": 1721816749587,
"name": "ed25519key",
"id": 11,
"enabled": true,
"default": false
}
}
```
**Important Response Fields:**
* **`client_id`**: Save this value—you'll need it for authentication
* **`public_key`**: Confirms the registered public key
* **`max_scope`**: The scopes assigned to this key
* **`enabled`**: Whether the key is currently active
## Step 3: Authenticate with Your Asymmetric API Key
To authenticate with an asymmetric API key, you must use **Deribit Signature Credentials** authentication (`grant_type: client_signature`). This requires signing your authentication request with your **private key**.
**Authentication Process:**
1. Create a signature by signing a message containing `timestamp`, `nonce`, and optional `data`
2. Send the signature along with your `client_id` to the [`public/auth`](/api-reference/authentication/public-auth) endpoint
3. Receive an `access_token` and `refresh_token` for subsequent API calls
**What you'll need:**
* Your **private key** (`private.pem` file)
* Your **Client ID** (received when creating the API key)
* A way to generate signatures (OpenSSL or Python)
### Method 1: Shell Script (OpenSSL)
This example shows how to authenticate using a shell script with OpenSSL for HTTP requests:
```bash theme={null}
# Set your base URL (test or production)
base_url="https://test.deribit.com"
# Generate timestamp (milliseconds since epoch)
timestamp=$( date +%s000 )
# Generate a random nonce (8 characters)
nonce=$( cat /dev/urandom | tr -dc 'a-z0-9' | head -c8 )
# HTTP method and URI
verb=GET
uri='/api/v2/private/get_current_deposit_address?currency=eth'
# Create temporary file for data to sign
datatosign=$(mktemp)
echo -ne "${timestamp}\n${nonce}\n${verb}\n${uri}\n\n" > ${datatosign}
# Your Client ID (received when creating the API key)
client_id="GgUXjYUj"
# Sign the data with your private key and encode for URL
signature=$(openssl pkeyutl -sign -inkey private.pem -rawin -in ${datatosign} | base64 -w 100 | sed 's#+#-#g;s#/#_#g;s#=##g')
rm ${datatosign}
# Make authenticated request
curl -s -X ${verb} \
-H "Authorization: DERI-HMAC-SHA256 id=${client_id},ts=${timestamp},nonce=${nonce},sig=${signature}" \
"${base_url}${uri}" | jq
```
**Note**: This example is for HTTP requests. For WebSocket authentication, see the Python examples below.
### Method 2: Python Script
#### Ed25519 Authentication (WebSocket)
```python theme={null}
import asyncio
from cryptography.hazmat.primitives import serialization
import websockets
import base64
import json
from datetime import datetime
# Your Client ID (received when creating the API key)
client_id = 'GgUXjYUj'
# Load your private key from the PEM file
with open('private.pem', 'rb') as private_pem:
private_key = serialization.load_pem_private_key(
private_pem.read(),
password=None # Set password if your key is encrypted
)
# Generate timestamp (milliseconds since epoch)
timestamp = round(datetime.now().timestamp() * 1000)
# Generate a random nonce (in production, use a secure random generator)
nonce = "abcd" # Replace with secure random value
data = "" # Optional additional data
# Create the message to sign: timestamp\nnonce\ndata
data_to_sign = bytes('{}\n{}\n{}'.format(timestamp, nonce, data), "latin-1")
# Sign with Ed25519 private key and encode as URL-safe base64
signature = base64.urlsafe_b64encode(
private_key.sign(data_to_sign)
).decode('utf-8').rstrip('=')
# Create authentication request
msg = {
"jsonrpc": "2.0",
"id": 1,
"method": "public/auth",
"params": {
"grant_type": "client_signature",
"client_id": client_id,
"timestamp": timestamp,
"signature": signature,
"nonce": nonce,
"data": data
}
}
# Connect and authenticate via WebSocket
async def call_api(msg):
async with websockets.connect('wss://test.deribit.com/ws/api/v2') as websocket:
# Send authentication request
await websocket.send(json.dumps(msg))
# Receive authentication response
response = await websocket.recv()
print("Auth response:", response)
# Parse response to get access_token
auth_result = json.loads(response)
if 'result' in auth_result:
access_token = auth_result['result']['access_token']
print(f"Authenticated! Access token: {access_token[:20]}...")
# Now you can make authenticated API calls
await websocket.send(json.dumps({
"jsonrpc": "2.0",
"id": 2,
"method": "private/get_positions",
"params": {
"currency": "btc"
}
}))
response = await websocket.recv()
print("Positions:", response)
# Run the async function
asyncio.get_event_loop().run_until_complete(call_api(msg))
```
**Installation:** `pip install websockets cryptography`
#### RSA Authentication (WebSocket)
RSA authentication is similar to Ed25519, but uses different padding and hashing:
```python theme={null}
import asyncio
from cryptography.hazmat.primitives import serialization, hashes
from cryptography.hazmat.primitives.asymmetric import padding
import websockets
import base64
import json
from datetime import datetime
# Your Client ID (received when creating the API key)
client_id = 'GgUXjYUj'
# Load the RSA private key from the PEM file
with open('private.pem', 'rb') as private_pem:
private_key = serialization.load_pem_private_key(
private_pem.read(),
password=None # Set password if your key is encrypted
)
# Generate timestamp (milliseconds since epoch)
timestamp = round(datetime.now().timestamp() * 1000)
# Generate a random nonce (in production, use a secure random generator)
nonce = "abcd" # Replace with secure random value
data = "" # Optional additional data
# Prepare the data to sign: timestamp\nnonce\ndata
data_to_sign = bytes('{}\n{}\n{}'.format(timestamp, nonce, data), "latin-1")
# Sign the data using RSA with PKCS1v15 padding and SHA256 hashing
signature = private_key.sign(
data_to_sign,
padding.PKCS1v15(), # RSA padding scheme
hashes.SHA256() # Hashing algorithm
)
# Encode the signature to URL-safe base64
encoded_signature = base64.urlsafe_b64encode(signature).decode('utf-8').rstrip('=')
# Create authentication request
msg = {
"jsonrpc": "2.0",
"id": 1,
"method": "public/auth",
"params": {
"grant_type": "client_signature",
"client_id": client_id,
"timestamp": timestamp,
"signature": encoded_signature,
"nonce": nonce,
"data": data
}
}
# Connect and authenticate via WebSocket
async def call_api(msg):
async with websockets.connect('wss://test.deribit.com/ws/api/v2') as websocket:
# Send authentication request
await websocket.send(json.dumps(msg))
# Receive authentication response
response = await websocket.recv()
print("Auth response:", response)
# Parse response to get access_token
auth_result = json.loads(response)
if 'result' in auth_result:
access_token = auth_result['result']['access_token']
print(f"Authenticated! Access token: {access_token[:20]}...")
# Now you can make authenticated API calls
await websocket.send(json.dumps({
"jsonrpc": "2.0",
"id": 2,
"method": "private/get_positions",
"params": {
"currency": "btc"
}
}))
response = await websocket.recv()
print("Positions:", response)
# Run the async function
asyncio.get_event_loop().run_until_complete(call_api(msg))
```
**Installation:** `pip install websockets cryptography`
**Key Differences from Ed25519:**
* RSA requires **PKCS1v15 padding** and **SHA256 hashing**
* Ed25519 signs directly without additional padding/hashing
## Frequently Asked Questions
### Can I use multiple asymmetric keys?
**Yes.** You can create and manage multiple asymmetric API keys for different applications, environments (test/production), or systems. Each key pair is independent and can have different scopes and permissions.
### What should I do if my private key is compromised?
**Immediately:**
1. **Revoke the API key** in your Deribit account (disable or delete it)
2. **Generate a new key pair** using the steps above
3. **Register the new public key** with Deribit
4. **Update your applications** to use the new key pair
**Prevention:**
* Store private keys securely (encrypted if possible)
* Use strong passwords for encrypted private keys
* Never commit private keys to version control
* Use environment variables or secure key management systems
### Are scopes and permissions still required for asymmetric keys?
**Yes.** Asymmetric keys work the same way as standard API credentials regarding permissions. You must assign specific **scopes** when creating the API key, which define what operations the key can perform. See the [Access Scope documentation](/articles/access-scope) for available scopes.
### Which key type should I use: Ed25519 or RSA?
**Ed25519 is recommended** for most use cases:
* **Faster** signature generation and verification
* **Smaller** key sizes (256 bits vs 2048+ bits for RSA)
* **Modern** cryptography with strong security guarantees
* **Simpler** implementation (no padding/hashing required)
**RSA** may be preferred if:
* You need compatibility with existing RSA infrastructure
* Your organization has specific RSA requirements
### Can I use the same key pair for test and production?
**Technically yes, but not recommended.** Best practice is to:
* Generate **separate key pairs** for test and production environments
* Use **different API keys** with appropriate scopes for each environment
* This provides better security isolation and easier key rotation
### How do I rotate my asymmetric keys?
1. Generate a new key pair
2. Register the new public key with Deribit (creates a new API key)
3. Update your applications to use the new key pair
4. Test thoroughly
5. Revoke the old API key once you've confirmed everything works